Thursday, 23 May 2019

Tracking Changes

Tracking Changes 


                                           Tracking changes is a utility feature of word that allows you to see what changes have been made to a document. The tools for tracking changes are found on the review tab on the ribbon.

Begin Track Changes :-
                                   To keep track of the changes in the document being prepared, we must click on track changes icon to start tracking changes.

Step 1 :- Click review tab on the ribbon and then click track changes button on tracking group.


Step 2 :- The changes made to the document are displayed 
               Ex. The following statement was not bold and italic initially but after the track changes option was clicked and apply it. Bold & Italic formating on the text the changes where recorded along side the statement.


Monday, 20 May 2019

Macrows


Macrows :- 
                      It is an advanced feature that can speed up editing or formating in a document macrow records sequences of menu selection choosen so that a series of action completed in 1 step i.e. macrow is a series of commands & instructions grouped together as a single command accomplish a task automatically.

To record a macrow follow the steps as :-

i] Step 1 :- Click the View Tab on the ribbon. Click on macrows button and select record macrow option the record macrow dialogue box gets opened.

ii] Step 2 :- In the macrow name box type the name for the macrow.


iii] Step 3 :- In the store macrow in box, select the document where you want to store macrow.


iv] Step 4 :- In description box, type a description for the macrow.


v] Step 5 :- Assign a macrow by one of the following methods create button to assign the macrow to a button on the Q.A.T.


1) Click button option in the record macrow window.


2) Under customized Q.A.T. of the word options window, select the document or all documents to add the macrow.


3) Under choose commands click the macrow being recorded & then add button.


4) To customize button click on modify & select the symbol to reused & type the name for macrow.


5) Click ok button twice to begin recording the macrow the symbol choosen is displayed on Q.A.T. The name typed is displayed when pointed to the symbol.


keyboard Shortcut :-
                                To assign the macrow to a keyboard shortcut to the column.

1) Click keyboard option of the record macrow window.


2) In the commands box click the macrow being recorded.


3) In the press new shortcut key box type the key sequence  require & then click assign button .


4) Click close button to begin recording the macrow.


vi] Step 6 :- Perform the actions to be included in the macrow to stop recording actions click stop recording in the macrow group of review tab.


*Running A Macrow
                                It is depends upon whether it has been added to the Q.A.T. or if it has been giving a keyboard shortcut.

*To run a macrow from the Q.A.T. simply click the micro icon.
  To run a macrow from the keyboard shortcut press the keys from the keyboard.

*Delete A Macrow
                             To delete a macrow click view macrow option & then choose the microw to be deleted & click delete button from the dialogue box.

Friday, 17 May 2019

Mail Merge

Mail Merge :- 


                                         It is used to create a set of documents such as a letter i.e. send to many customers or a sheet of address labels each letter or label has the same kind of information yet the contained is unique . Ex. In letters to the customers each letter can be personalize to address, each customer by name.
     The unique information in each letter comes from entry inn data source. Using Mail Merge we can create 


A] A Set Of Labels or Envelopes :- 
                                                The return address is same on all the labels or envelopes but the destination address is unique.


B] A Set of  Letters, E-Mail, Messages :- 


                                         the basic contain is same in all letters and messages but each contains information i.e. specific to the individual recipient such as name, address or any personal data.
                             The mail merge process contains following steps :-

1] Set up the main document :-
                                                 
                                          
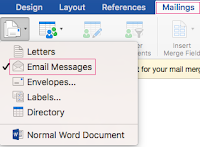
                                          On the mailings tabs in the start mail merge group, click mail merge the brokdown menu list appears. Click the type of document that you want to create such as letters, email, messages, envelopes etc.


2] Connect the document to a data source :-
           
                                                    To merge information into the main document the must connect the document data source or a data file.                                                      
                                                  On the mailings tab, in the start mail merge group click select recipients the brokdown menu list appears. Select the option as per your requirement or click on type new list option. If you don't have a data file yet.


3] Refine the list of recipients :- 
                              

                                                        When we connect to a certain data file we might not want to merge information from all the records inn that data file to main document to narrow the list of recipients click edit recipients list in the start mail merge group select one of the options from select individual records, sort records, filter records in mail merge recipient dialogue box. 


4] Add place holders to the main document :-


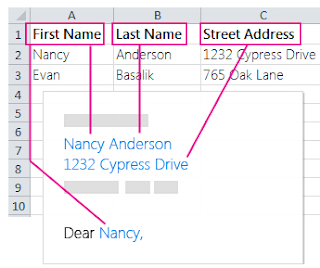
                               After the main document is connected to a data file, type the text of a document & add place holder such as address & greetings line that indicate where the unique information appears. Each copy of the document when we merge, information from the 1st row in data source replaces the fields create 1st merge document & so on.


5] Type content & add fields :-
             

                                           In the main document click where the other fields is to the inserted use right & insert fields group to insert address elements with different formats, name format & other merge fields.


6] Preview & complete the merge :-


                                                  The merged document can be previewed to preview click on preview results group on the mailings tab in finish group, print document or edit  individual document option as per your requirement you can print or save or mail on the created letters.

Wednesday, 15 May 2019

Cell Alignment

Cell Alignment :-
                                  The cell alignment sets the data into the cell to the selected alignment the cell alignment offers 9 options such as top left, top center, top right, bottom left, bottom center, bottom right, center left, center & center right.
                                   To set or change cell alignment, select the cells & then click the desired option from alignment group of layout tab under table tools.


1] Merging Cells :-
                         two or more cells in the same row or columns  can be combined into a single cell to  merge cells do the following 

Step 1 :- Select the cells to be merged by clicking the cells.
Step 2 :- Under table tools on the layout tab in the merged group click merge cells.


2] Splitting Cells :-
                               Splitting is used to divide cells into number of rows and columns.

Step 1 :- Click in a cell or select multiple cells that are to be splitted.
Step 2 :- Under table tools on the layout tab in the merge group click split cells option the split cells dialogue box gets opened. 
Step 3 :- Select number of columns and number of rows that you want to split the selected cells.
Step 4 :- Click on ok button.


3] Sorting :- 
                    The row in the table can be sorted into ascending or descending order by using sort option to sort data use following steps 

Step 1 :- Click the table to be sorted.
Step 2 :- Under table tools on layout tab in the data group click on sort button the sort dialogue box gets opened.
Step 3 :- In the sort dialogue box select the options like column number, type of sort(text, number and date) and ascending or descending sorting order.


Tuesday, 14 May 2019

How To Insert Table In MS-Word

How To Insert Table In MS-Word


                         Tables are used to display data in tabular format the table option contains inert , table, draw table, excel spreadsheet and quick table.   

  1] Insert Table :- 
                              The table can be inserted is anyone of the following ways :-

Step 1 :- Place the curser to the page where new table is inserted.
Step 2 :- click the insert tab of the ribbon.
Step 3 :- To hover the mouse of the grid displayed under the insert table section of the menu displayed. The number of columns ad rows selected containing table displayed on the document.


OR


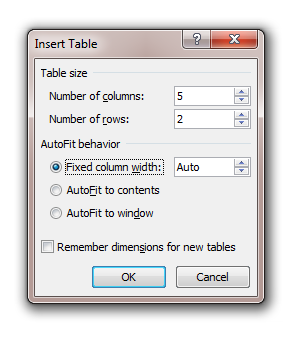
Step 1 :- Click Insert Table option of the 2nd option on the list the Insert Table dialogue box appears.
Step 2 :- Enter the number of rows & columns under table size sections.
Step 3 :- Under autofit behaviour, choose one of the given options to adjust the table size as fixed column width ( set a specific width for the columns) autofit to contains  (automatically resize the column to fit the contain) , autofit the window (automatically resize the table to fit in a web browser window).


 2] Draw Table :-
                          We can draw a complex table with varying number of columns per row to draw a table follow the steps as 

Step 1 :- Click where you want to insert table.
Step 2 :- On the insert tab in the tables group click draw table, the pointer changes to a pencil.
Step 3 :- To define the outer boundry of table draw a rectangle.
Step 4 :- Draw a column & row lines inside the rectangle.


3] Excel Spreadsheet :-
                                    We can insert excel spreadsheet into word document to organize data in table format to insert excel spreadsheet do the following :-

Step 1 :- Select excel spreadsheet option from the tables group of Insert Tab. The excel spreadsheet is inserted into the document.
Step 2 :- Enter your data in spreadsheet.


4] Quick Table :-
                           MS-Word has many build in table styles. This include calendar table, style table, double table, matrix and a table with subheadings to insert Quick Table follow the steps as :-

Step 1 :- Select the Insert tab and click table button in tables group.
Step 2 :- Select quick tables option from brokdown list 
Step 3 :- Click the table style you want to insert.


Monday, 13 May 2019

Features Of MS-OFFICE

Features Of MS-OFFICE 


1. OFFICE BUTTON :-
                          

                                  The office button located on the top left of the window, replaces the file menu and provides access to functionality common across all office applications including opening, saving, printing a file.


2. RIBBON :-


                              The ribbon, a panel that houses a fix arrangement of command buttons & icons , organizes commands as a set of tubs, each grouping relevant to commands. Each applications has a different set of tube that exposes functions that the application off us.
                              The ribbon is designed to make the features the application more discoverable and accessable with fever mouse clicks.

                            
3. LIVE PREVIEW :- 


                       MS-Office also introduces a feature called live preview, which temporarily applies formatting on the focused text or object when the mouse pointer is moved from the button. This allow user to have a preview of how the option good affect the appearance of the object, without actually applying it.


4. MINI TOOLBAR :-
           

                                   The mini toolbar is a small toolbar with basic formatting commands that appears within the document editing area when the mouse selects types. if remains semitransparent until the mouse pointer is hovered on it.


5. CONTEXTUAL TAB :-


                      Some tabs called contextual tabs, appear only when certain objects are selected these tabs expose functionality specific only to the object with focus fro e.g., selecting a table brings up the format & layout tabs which presents options for dealing with table. 


6. QUICK ACCESS TOOLBAR :- 


                      Quick access toolbar locates in the title bar near the office button & serves as a repository are most used function, such as save, undo/redo & print. It is customisable any command available inn the entire office application can be added the quick access toolbar.


7. THEMES AND QUICK STYLES :- 


                                       MS-Office places more emphasis on document themes & quick styles.The themes defines the colours, fonts and graphic effects for our document almost everything that can be inserted into a document to match the overall document theme creating a consistent document design quick styles are galleries with a range of styles based on the current theme their are quick style galleries for beds, table, charts etc.


8.SMART ARTS :- 


                           Their are multiple preset smart art graphics, layout, templates in categories such as list, process, cycle and hierarchy. Each smart art graphic based on its designs maths, index, outline, automatically recycled for the base fit on to the graphic, smart art graphics change their colours, fonts and effects to match the documents theme.


Friday, 10 May 2019

How To Change Font, Font Style, Font Size and Font Color In MS-WORD

How To Change Font, Font Style, Font Size and Font Color In MS-WORD


Step 1 :- First Open MS-WORD.


Step 2 :- Then Click Home Tab.


Step 3 :- After Clicking Home Tab Open Font Group.


Step 4 :-  Then Click Font  and Select The Font You Want.


Step 5 :- After The Selecting Font Click Font Style and Choose Which Font Style Suitable For Your Text.


Step 6 :- Then Go To Size And Select The Size Which Size Suitable For Your Text .


Step 7 :- If You Want To Color Your Text Then Giv
e It From Font Color Option.


Step 8 :- If You Want To Apply Effect Then Give From Effects Option.


Front-End Development

What is a Front-End Development ?                          Front-end Development is the process of building components that interact with us...