Monday, 25 November 2024

Front-End Development

What is a Front-End Development ?


                    Front-end Development is the process of building components that interact with users.        

                    Everything you see on a Website like paragraphs, buttons, links, animations and many more, were created by Front-end Developer. It is the front-end developer's job to take the vision and design concept from the client and implement it through the code.


What Skills You Have to Need to Become a Front-End Developer ?

                    Three main languages you need to know - HTML, CSS & JAVASCRIPT. Let's see what is the role of these languages in front-end development.

HTML :- 


                    Hyper Text Markup Language or HTML is a standard markup language for describing the structure of documents displayed on the web. Html displays the content on the page like paragraph, buttons, links, headings and lists. With the help of Html you can build basic webpage.

CSS :- 


                    CSS stands for Cascading Style Sheet which is styling document used to define presentation of layout of documents written in html. It is fundamental concept of modern web development allowing developers to control the visual aspect of html element.
                    With the help of Html and Css you can easily build small pages which can be attractive.

JavaScript :- 


                    JavaScript was known as Scripting Language in early days. It is an Programming Language of the web which is highly flexible & is mainly used to developed user-friendly & dynamic features for website. 
                    It is an important language of the web development along with HTML & CSS. ( It is an core language of a web ). It is an most use Programming Language for frontend application as well as Software Development.

Sunday, 9 June 2019

MS-EXCEL

MS-EXCEL


Introduction :-
                    Ms-excel is the most popular spreadsheet software available for computer and one of the major components of ms-office. Ms-excel allows you to create, manage, store, analyze and presenting data in tabular format. It is also used to perform simple arithmatic operations as well as trigonometry, statistical and business calculations with excel you can prepare annual reports, invoices, salary statements, income tax statements, developing business plans inserting graphs, charts etc.

Features :-

1) Ms-excel allows you to enter, modify, delete and stored to data electronically.

2) Using excel, you can prepare wide variety of highly customisable business        charts.

3) Excel spreadsheet can be used to create computerised ledger.

4)Ms-excel is a multiple document interface which needs you can open more  than 1 doc. inside the application.

5) Ms-excel provides mathematical, statistical string functions using these        functions you can preform any calculations if the entries in the sales are          changed then formulas automatically calculated the new results.

6) Ms-excel can import data from a wide variety of sources.

7) Excel provides auto shapes features to create simple and complex diagrams.

8) Excel makes it easy to sort, filter, summarise and manipulate stored in the  worksheet.

9) Excel is used to create budgets, analyze survey results, preform any type of financial analysis.

10) Excel also has the facility of spellcheck, tracking changes, macrows, error    checking.

Tuesday, 4 June 2019

Shortcuts

Shortcuts Of MS-WORD


     Action                                                                    Keystroke

1] Select all the contents of the pages                             ctrl+A

2] Bold highlighted section                                             ctrl+B

3] Copy selected text                                                     ctrl+C

4] Open font window                                                     ctrl+D

5] Align the lines or selected text to the center 
   of the screen                                                             ctrl+E

6] Opens find box                                                         ctrl+F

7] Italic highlighted section                                            ctrl+I

8] Aligns the selected text or lines to justify screen          ctrl+J

9] Insert link                                                                ctrl+K

10] Aligns the lines or selected text to the left of 
      screen                                                                   ctrl+L 

11] Open the print window                                            ctrl+P

12] Aligns the lines or selected text to the right of 
     screen                                                                    ctrl+R

13] Save the open document                                         ctrl+S

14] Underline the selected text                                      ctrl+U

15] Paste                                                                     ctrl+V

16] Cut selected text                                                    ctrl+X

17] Redo the last action perform                                   ctrl+Y

18] Undo the last action perform                                   ctrl+Z

19] Change the font                                                     ctrl+shift+F

20] Increase selected font +1pt upto 12 pt 
     & then increase font +2 pt                                       ctrl+shift+>

21] Increase selected font +1pt                                   ctrl+]

22] Decrease selected font by 1pt. If 12 pt or lower 
     If above 12 decrease font by 2 pt                           ctrl+shift+<

23] Decrease selected font by 1pt                                ctrl+[

24] Moves 1 word left                                                 ctrl+left arrow

25]Moves 1 word to right                                            ctrl+right arrow

26] Moves to the beginning of the line or paragraph      ctrl+up arrow

27] Moves to the end of the paragraph                        ctrl+down arrow

28] Deletes word the right of the curser                      ctrl+Del

29] Deletes word to the left of curser                         ctrl+Backspace

30] Moves the curser to the end of the document       ctrl+End

31] Moves the curser to the beginning of the 
     document                                                          ctrl+Home

32] Opens new document                                     Alt+Ctrl+F2 OR Ctrl+O

33] Open help                                                         F1

34] Open Find, Replace, go to window                       F5

35] Spellcheck and grammer                                    F7

36] Save as                                                            F12 OR Ctrl+S

37] Change the text from uppercase to 
     lowercase                                                          Shift+F3

38] Save open document                                     Shift+F12 OR Ctrl+S

39] Insert current date                                          Shift+Alt+D

40] Insert current time                                          Shift+Alt+T

41] Single space lines                                            ctrl+1

42] Double space lines                                           ctrl+2

43] 1.5 line spacing                                               ctrl+5

Thursday, 23 May 2019

Tracking Changes

Tracking Changes 


                                           Tracking changes is a utility feature of word that allows you to see what changes have been made to a document. The tools for tracking changes are found on the review tab on the ribbon.

Begin Track Changes :-
                                   To keep track of the changes in the document being prepared, we must click on track changes icon to start tracking changes.

Step 1 :- Click review tab on the ribbon and then click track changes button on tracking group.


Step 2 :- The changes made to the document are displayed 
               Ex. The following statement was not bold and italic initially but after the track changes option was clicked and apply it. Bold & Italic formating on the text the changes where recorded along side the statement.


Monday, 20 May 2019

Macrows


Macrows :- 
                      It is an advanced feature that can speed up editing or formating in a document macrow records sequences of menu selection choosen so that a series of action completed in 1 step i.e. macrow is a series of commands & instructions grouped together as a single command accomplish a task automatically.

To record a macrow follow the steps as :-

i] Step 1 :- Click the View Tab on the ribbon. Click on macrows button and select record macrow option the record macrow dialogue box gets opened.

ii] Step 2 :- In the macrow name box type the name for the macrow.


iii] Step 3 :- In the store macrow in box, select the document where you want to store macrow.


iv] Step 4 :- In description box, type a description for the macrow.


v] Step 5 :- Assign a macrow by one of the following methods create button to assign the macrow to a button on the Q.A.T.


1) Click button option in the record macrow window.


2) Under customized Q.A.T. of the word options window, select the document or all documents to add the macrow.


3) Under choose commands click the macrow being recorded & then add button.


4) To customize button click on modify & select the symbol to reused & type the name for macrow.


5) Click ok button twice to begin recording the macrow the symbol choosen is displayed on Q.A.T. The name typed is displayed when pointed to the symbol.


keyboard Shortcut :-
                                To assign the macrow to a keyboard shortcut to the column.

1) Click keyboard option of the record macrow window.


2) In the commands box click the macrow being recorded.


3) In the press new shortcut key box type the key sequence  require & then click assign button .


4) Click close button to begin recording the macrow.


vi] Step 6 :- Perform the actions to be included in the macrow to stop recording actions click stop recording in the macrow group of review tab.


*Running A Macrow
                                It is depends upon whether it has been added to the Q.A.T. or if it has been giving a keyboard shortcut.

*To run a macrow from the Q.A.T. simply click the micro icon.
  To run a macrow from the keyboard shortcut press the keys from the keyboard.

*Delete A Macrow
                             To delete a macrow click view macrow option & then choose the microw to be deleted & click delete button from the dialogue box.

Friday, 17 May 2019

Mail Merge

Mail Merge :- 


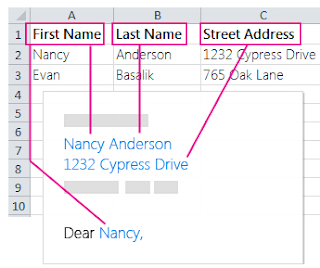
                                         It is used to create a set of documents such as a letter i.e. send to many customers or a sheet of address labels each letter or label has the same kind of information yet the contained is unique . Ex. In letters to the customers each letter can be personalize to address, each customer by name.
     The unique information in each letter comes from entry inn data source. Using Mail Merge we can create 


A] A Set Of Labels or Envelopes :- 
                                                The return address is same on all the labels or envelopes but the destination address is unique.


B] A Set of  Letters, E-Mail, Messages :- 


                                         the basic contain is same in all letters and messages but each contains information i.e. specific to the individual recipient such as name, address or any personal data.
                             The mail merge process contains following steps :-

1] Set up the main document :-
                                                 
                                          
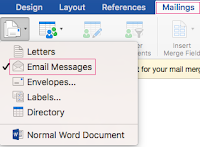
                                          On the mailings tabs in the start mail merge group, click mail merge the brokdown menu list appears. Click the type of document that you want to create such as letters, email, messages, envelopes etc.


2] Connect the document to a data source :-
           
                                                    To merge information into the main document the must connect the document data source or a data file.                                                      
                                                  On the mailings tab, in the start mail merge group click select recipients the brokdown menu list appears. Select the option as per your requirement or click on type new list option. If you don't have a data file yet.


3] Refine the list of recipients :- 
                              

                                                        When we connect to a certain data file we might not want to merge information from all the records inn that data file to main document to narrow the list of recipients click edit recipients list in the start mail merge group select one of the options from select individual records, sort records, filter records in mail merge recipient dialogue box. 


4] Add place holders to the main document :-


                               After the main document is connected to a data file, type the text of a document & add place holder such as address & greetings line that indicate where the unique information appears. Each copy of the document when we merge, information from the 1st row in data source replaces the fields create 1st merge document & so on.


5] Type content & add fields :-
             

                                           In the main document click where the other fields is to the inserted use right & insert fields group to insert address elements with different formats, name format & other merge fields.


6] Preview & complete the merge :-


                                                  The merged document can be previewed to preview click on preview results group on the mailings tab in finish group, print document or edit  individual document option as per your requirement you can print or save or mail on the created letters.

Wednesday, 15 May 2019

Cell Alignment

Cell Alignment :-
                                  The cell alignment sets the data into the cell to the selected alignment the cell alignment offers 9 options such as top left, top center, top right, bottom left, bottom center, bottom right, center left, center & center right.
                                   To set or change cell alignment, select the cells & then click the desired option from alignment group of layout tab under table tools.


1] Merging Cells :-
                         two or more cells in the same row or columns  can be combined into a single cell to  merge cells do the following 

Step 1 :- Select the cells to be merged by clicking the cells.
Step 2 :- Under table tools on the layout tab in the merged group click merge cells.


2] Splitting Cells :-
                               Splitting is used to divide cells into number of rows and columns.

Step 1 :- Click in a cell or select multiple cells that are to be splitted.
Step 2 :- Under table tools on the layout tab in the merge group click split cells option the split cells dialogue box gets opened. 
Step 3 :- Select number of columns and number of rows that you want to split the selected cells.
Step 4 :- Click on ok button.


3] Sorting :- 
                    The row in the table can be sorted into ascending or descending order by using sort option to sort data use following steps 

Step 1 :- Click the table to be sorted.
Step 2 :- Under table tools on layout tab in the data group click on sort button the sort dialogue box gets opened.
Step 3 :- In the sort dialogue box select the options like column number, type of sort(text, number and date) and ascending or descending sorting order.


Front-End Development

What is a Front-End Development ?                          Front-end Development is the process of building components that interact with us...